Friday, 18 December 2015

Present sewing

With Christmas looming, sewing for myself has taken a back seat. The past three weeks have been a mixture of delight and panic at the amount of sewing I needed to do. Phew though, as of about an hour ago I made my way to the end. This was mainly thanks to the fact that work tends to slow down heavily in the last week before Christmas holidays so I have been able to sew in the evenings which is usually impossible. My first Christmas make this year was a pair of tote bags. I made them with a meter each of Liberty Lawn which I bought in the Abakhan Liberty sale over Black Friday.
I'm really pleased with how they turned out and with the new shopping bag policy I think that they're a pretty useful gift. I'd like one myself but it seems so indulgent to use a meter of Liberty lawn for a bag for myself.
The pattern came from the rather lovely book 'The Liberty Book of Home Sewing' which gives very clear instructions on making the bag. It also gives ideas for how to take your product further. For the bags it shows you how to make a small bag carrier so you could clip it into your handbag. The book doesn't come with patterns but gives easy to follow instructions on how to make your own.
The bags have a small amount of top stitching. Something which I'm not very confident doing and which could definitely be better on the bags as you can see! I tend to wobble off line as soon as there's a curve!
The bags are joined by the handle and strengthened by sewing triangles. Whilst this isn't the prettiest finish (I considered many others) I came to the conclusion that it was the most practical. Here's hoping that the recipients like them as much as I do! How is your Christmas sewing coming along?

Sunday, 6 December 2015

I admit it...I'm a selfish sewer.

It's confession time...I am at heart a selfish sewer. Despite having made many things for myself, clothing, quilts and cushions to name but a few I still really prefer to sew for myself. But Christmas is upon us...and I find myself considering sewing gifts for other people.

Making gifts for people is so personal, the time spent choosing patters, fabric and sizing. Then there is all the time which you invest making the item itself. Making something is so personal that I really only do it for people who I am sure will like what I make. I'd feel incredibly sad if I made something for someone only to find that it either sat collecting dust in a cupboard or worse...never even made it into the cupboard to start with.

Despite this I have decided to be brave and attempt to make some Christmas presents this year... for people who I think I know well enough to choose pattern and design for.

So here is my first unselfish make...

I made these pyjama bottoms for my boyfriend using the Tilly and the Buttons pattern in Love at First Stitch. As I want them to be a surprise I used an existing pair he has to choose the size to make.
I made them using a cotton I found at Walthamstow Market. I really like the design on them but boy do they crease! I'm sure you won't believe that I actually ironed these before taking photos! I'm pretty pleased with how well I managed to match the stripes going across the trousers. Pattern matching is usually disastrous for me! Tilly recommends having a tie go through the waist band but I wanted to use elastic instead. To use elastic I cut it to size then sewed the grosgrain ribbon on each end. This could then be fed through the waist band and top stitched it down to secure it.
As they are a present I couldn't resist adding a little extra detail...
I decided to cross stitch the initials of his name onto the top of the pyjamas. I did this by using soluble cross stitch canvas. It's brilliant stuff, you stich your design on, pop it in warm soapy water and hey presto 10 minutes later it's disappeared!

All in all I am please with them...here's hoping that he is too and I may become more open to a little more unselfish sewing.

Sunday, 29 November 2015

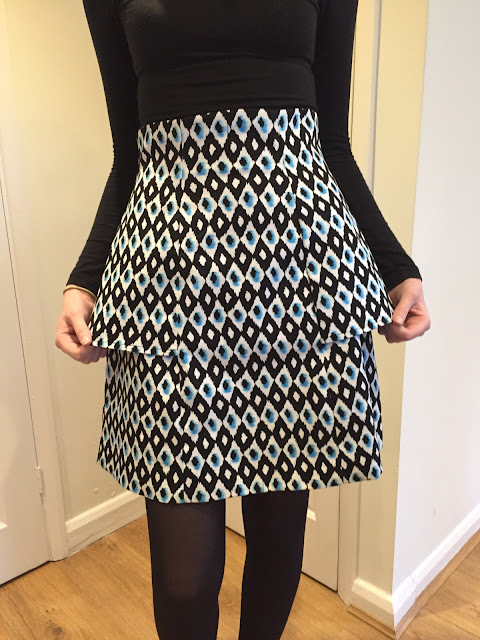
Deer and Doe Anemone

I am quickly becoming a HUGE fan of Deer and Doe patterns! They are always truly beautiful inside and out! I made the Anemone in a stretch twill which I bought from Goldhawk road and it's lined in blue cotton. I cut it out of one and a half metres easily even when I was attempting to match the horizontal lines of the pattern. I was convinced that I wanted to make a patterned Anemone but maybe the peplum detail would have stood out more if I had made it plain.
The pattern was beautifully easy to sew. Because there were so many parts to the skirt I found it useful to write the name on each with a washable pen so I didn't get confused. The instructions were easy to follow and unlike many of the things I have made it was completely stress free!
Because of the curve which runs through each pattern piece I wasn't able to pattern match completely but it definitely could have been much better than it is. Pattern matching is a skill I really need to work on. If you have any tips that would be brilliant!
it could have done with being taken in slightly on the waist. I hadn't anticipated it sitting quite as high as it does so when fitting I didn't fit it to the correct place on my waist.
I'm completely in love with the peplum detail!
The lining makes the skirt feel absolutely gorgeous to wear. I love it when an item of clothing is beautiful both inside and out, it makes it feel so special.

Saturday, 21 November 2015

Arielle

I have had Tilly and the Buttons Arielle and this wool fabric for a while, for some reason it just never came to the top of my 'Must Sew Now List'! But I decided that it was time to move away from dresses and sew some separates and I'm certainly glad I made it. I used herringbone wool for the fabric which I bought from Walthamstow market from the man outside Sainsburys. I made a size 1 on the waist grading out to a 2 at the hips. I cut this size out of one and a half meters (160cm wide) and had quite a bit left over. I'm really pleased with the skirt and I can't wait for an opportunity to show it off and wear it!
This is one of the few items that I have made which I'm actually happy with the fit. I was very conscious that I didn't want the buttons to pull at all and I think they look pretty good!
It was very straightforward to make and as ever Tilly's instructions were easy to follow and full of helpful tips. I got myself into a bit of a pickle when it came to attaching the lining to the skirt as it didn't fit, only to realise that I had forgotten to sew the darts on the back of the skirt! After realising my mistake the lining went in easily.
When considering linings and buttons I tend to get all my buttons out to see what colours work and I instantly fell in love with the unusual combination of the red gingham hearts with the herringbone so I decided to roll with it and line it with red gingham too. I bought the lining from ebay where there was plenty of choice.
There's something very charming about the lining and buttons...It must remind me of summer dresses from when I was little. I am definitely a convert to lining items of clothing, in my head it makes them feel more special and I love how beautiful it makes them inside and out.

Sunday, 15 November 2015

Beautiful Betty

I have had this beautiful wool fabric and the Sew Over It Betty dress pattern in my stash for a while. It wasn't until the weather began to turn that I decided it was the time to get sewing. I'm so glad I did because I am completely and utterly in love with this dress!
I made the dress in a light link wool which I bought from Sew Over It. I can't take credit for the fabric choice, I decided to make it after seeing this dress in the Sew Over It Islington shop. I don't think I would have felt confident in making it in wool unless I had seen it made up.
The style of the dress is gorgeous with a fitted bodice, full circle skirt and a V-neck back. The combination just makes me feel so special. A gorgeous full circle like this one is just asking to be twirled...
The construction was easy and the instructions were, as always from Sew Over It, very clear to follow. I had a little bit of trouble with the zip, which was more difficult to insert due to the bulky fabric.

As it was made in wool I decided to line the bodice to ensure that it didn't feel scratchy at all. I love the combination of the strawberry fabric with the wool.
I have always found curved hems difficult to hem, ending up with ugly pulling until I made the Deer and Doe Datura and discovered using bias binding. As I loved this dress so much I decided to take the time to make my own bias binding using the lining and I love the effect. It just makes it feel that bit special and little touches like these make handmade clothes feel so special.
I absolutely cannot wait for a special occasion to wear Betty!

Saturday, 7 November 2015

Hall of Horrors

I'm going to breathe in deeply and attempt not to wince too much as I write this entry. These are a few (sadly there are more) of my sewing failures. I know that I shouldn't be so stroppy about my failures after all failure is how we learn but all the wasted hours and beautiful fabric is just so frustrating.

My first failure is the Tilly and the Buttons Mimi blouse. This was the second item of clothing I made and it is poorly constructed. However, for me, more guiling that than is this contrast buttons and collar I chose which make it look like it would be more at home at a bowling alley. Looking back at the pattern now, it's not a top which I would usually choose for myself so I'm not sure why I thought that it was a good idea to invest hours in making myself one.

All in all then it was a failure for a huge range of reasons; poor construction; terrible fabric choice and a pattern which just isn't my style.

Onto the next one and this one really stings. The Colette Hawthorn. I think I must have invested four weekends worth of sewing in this dress. It was a disaster from the start. I measured myself but decided that I couldn't possibly be that size so I cut the size up, which was huge, poorly fitting and very unflattering. After some alterations to the bodice I decided to continue. I wanted to make it with the sleeve plackets (due to being stubborn I would not quit and resolve to have it sleeveless). These took me forever and are still incorrect! Even after attempting them countless times. After finally deciding to finish it anyway it is extremely unflattering on me. It makes me feel old fashioned and frumpy. Such as shame, as I know that there are some truly beautiful Hawthorns out there and I love the fabric which I bought in the John Lewis sale. Perhaps when I'm ready I will be able to rescue it and turn it into a sleeveless dress which could be more flattering on me.

This brings me to my most recent failure which happens to be my project from last weekend. I decided to make the Sew Over It shift dress in a cotton which I bought at the Knit and Stitch fair. I just love the black cats! This dress is very unflattering on me, so much so that I'm struggling to finish it (the hem is currently pinned and sleeves unfinished). The cotton is medium weight, the pattern does say to use lightweight, so it is probably my fault for choosing the wrong fabric. I usually like quite baggy clothes with simple almost shapeless silhouettes but this dress just doesn't work for me. It billows out at the top then clings to the hips. I think that I need a shift dress which is more A-line. I used my Simplicity cord dress to adapt the shape but it still doesn't suit me or feel right.
I'm really sad about this one as I absolutely love the fabric. I've considered adding in a black triangle at the sides to make it an A-line shape or turning it into a top to save it. What do you think or do I just need to resolve myself to having lost the fabric?

Saturday, 31 October 2015

Sew Over It Box Pleat Skirt

A few months ago, for my birthday, I was bought Lisa Comfort's Sew Over It: Vintage. I thoroughly enjoyed reading it but I avoided using it due to the self drafting element of the book.
After taking a few deep breaths I decided to have a go and draft a pattern for the box pleat skirt. The skirt has two box pleats at the front and is gathered at the side to the zip. I used a turquoise rayon which I bought at The Knit and Stitch Show. Once I got my head around the maths behind it all I managed to create a self-drafted pattern. It was a little daunting to then cut into the fabric as I really didn't know if I had made the pattern correctly! However, the drafting went well and it has produced a beautifully fitting skirt. Because it was self drafted I made no alterations at all which was lovely as I find fitting a garment the hardest part of sewing. The instructions were clear and easy to follow but are definitely a little more bare than those on her patterns.
The rayon makes the dress feel floaty and really nice to wear.
The box pleats are sitting quite well and I love how they merge into the gathers.
I decided to keep the skirt long as I think that I could then transition it into summer as well!
I have to say, the waistband looks rather wonky in this photo but I'm hoping that it's just that I'm not standing straight!The construction was unusual at the back, with the zip only being inserted to the bottom of the waist band. I then secured the waist band with two hook and eyes. If I made the skirt again I would either extend the zip to the top of the waistband or extend the waistband over lap and have buttons instead to make a design feature. I will definitely have another go at self drafting and will use the book again! I have got my eye on the 1950s cape. Happy sewing!